Fluval Edge Fluorescent Lighting
5 posters
Page 1 of 1

Fluval Edge Fluorescent Lighting
![]() MrGator Sat Jul 17, 2010 1:04 pm
MrGator Sat Jul 17, 2010 1:04 pm
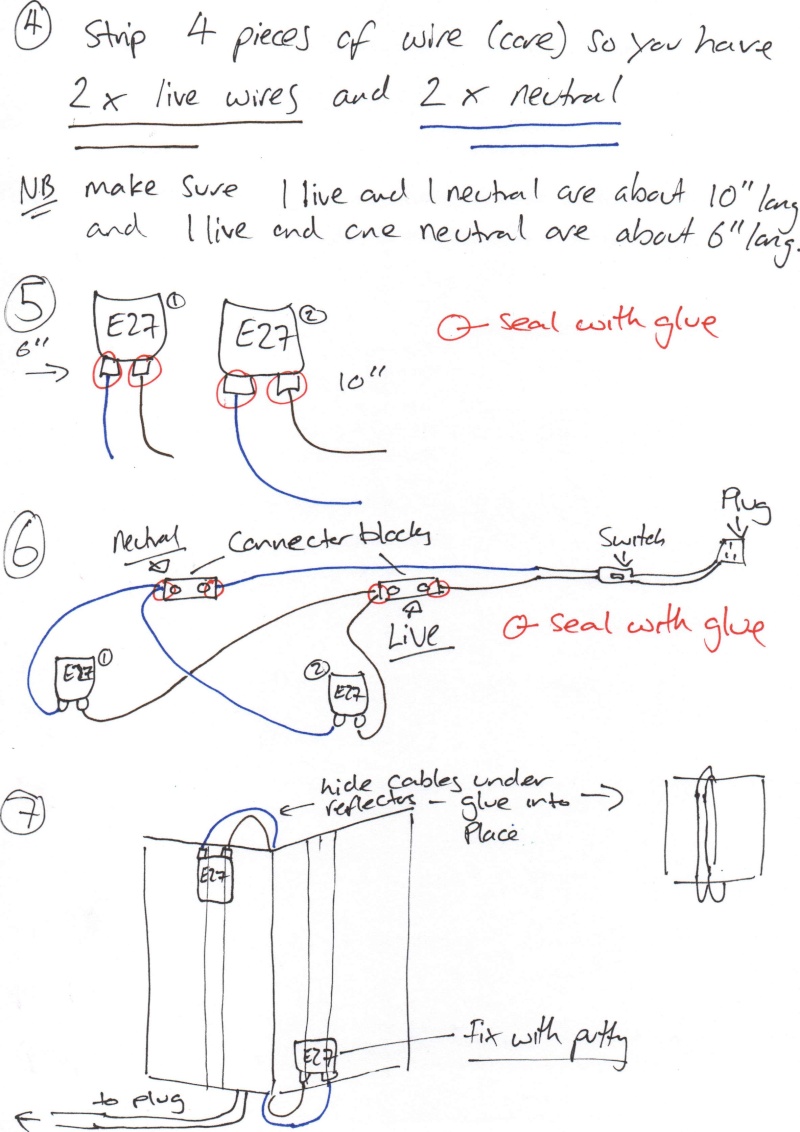
ok, so today all of my bits arrived for me to attempt a CFL (compact fluorescent light) mod! I was so excited that I had to try it straight away!
So, here's everything laid out on the table, ready for me to start

I ordered some ceramic E27 fittings normally used in a vivarium, two Interpet 15w bulbs (used in the interpet fish pods), an inline switch, and a 15w juwel reflector (used for normal T5/T8 lighting).
I also used some epoxy putty as a fixing agent which means horrid, messy fingers - hence the lack of photos during construction - sorry!
The first thing I did was wire the inline switch (not very exciting)

next, I measured the reflector 7.10" from each end and cut it out - very easy just using kitchen scissors!
I used epoxy putty to fix the reflector together in, back to back and then sealed with a glue gun to prevent any fume leakage (the amount I used, there shouldn't be much, especially after it's set.
I wired the E27 sockets up in series, using connector blocks and then stuck the socket to the reflectors, top and tail using epoxy and again sealed everything in with hot glue.
The moment of truth - I popped the bulbs in, plugged it in and flicked the switch.
Next, I removed the lighting arm and fitted the new lights into the hood - fixed with a tot of glue, but not much!

LET THERE BE LIGHT!


So, here's everything laid out on the table, ready for me to start
I ordered some ceramic E27 fittings normally used in a vivarium, two Interpet 15w bulbs (used in the interpet fish pods), an inline switch, and a 15w juwel reflector (used for normal T5/T8 lighting).
I also used some epoxy putty as a fixing agent which means horrid, messy fingers - hence the lack of photos during construction - sorry!
The first thing I did was wire the inline switch (not very exciting)
next, I measured the reflector 7.10" from each end and cut it out - very easy just using kitchen scissors!
I used epoxy putty to fix the reflector together in, back to back and then sealed with a glue gun to prevent any fume leakage (the amount I used, there shouldn't be much, especially after it's set.
I wired the E27 sockets up in series, using connector blocks and then stuck the socket to the reflectors, top and tail using epoxy and again sealed everything in with hot glue.
The moment of truth - I popped the bulbs in, plugged it in and flicked the switch.
Next, I removed the lighting arm and fitted the new lights into the hood - fixed with a tot of glue, but not much!
LET THERE BE LIGHT!
Last edited by SeannyMagoo on Mon Jul 19, 2010 2:34 pm; edited 1 time in total

MrGator- Angelfish
- Posts : 71
Join date : 2010-06-30
Age : 41
Location : London, UK -

Re: Fluval Edge Fluorescent Lighting
![]() MikeJones Mon Jul 19, 2010 7:09 am
MikeJones Mon Jul 19, 2010 7:09 am
Seann, I assume you have taken the entire lighting arm off the tank now as presumably with the fluorescents there is no need for them and they just get in the way?
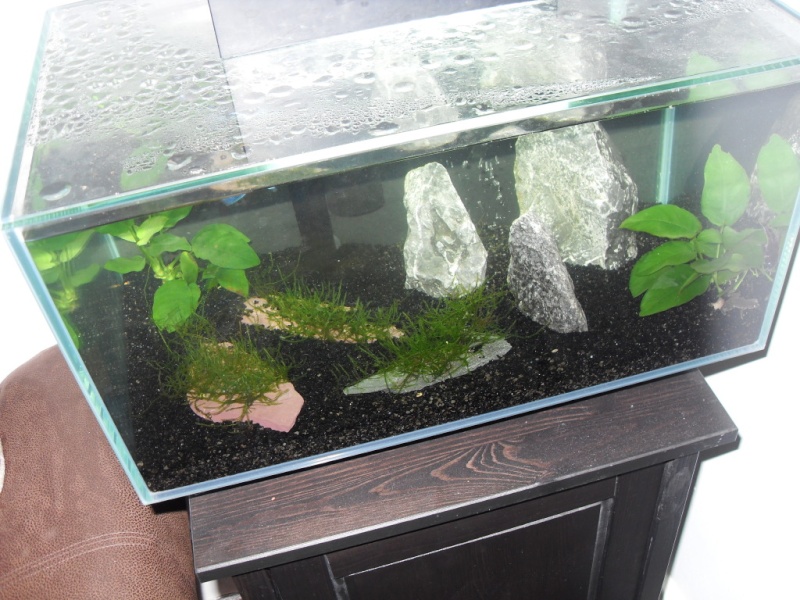
Finally planted my tank today with some flame moss tied to a nice piece of slate, two lilaeopsis noveazeelandiae planted to form a carpet and a pogostomon helferi. Hopefully this will increase the conditions in the tank for the fish (two died after moving the tank from Northampton to Reading!)
The plan now is to organise a lighting mod as well as buying a siamese fighter. The only thing I am worried about is the recommendations not to keep a fighter with guppies.....?
So as it stands I have 4 guppies (much smaller than most I have seen in shops, not sure why...) 2 white mollies and a small moth cat fish (there were originally three of these but sadly they kept getting sucked up the filter tube until i installed a foam tip to stop this happening!
I will post a picture soon.
One last question though; Sean where did you get the equpiment for the lighting mod? (CFL?)
MikeJones- Neon Tetra
- Posts : 2
Join date : 2010-07-07
Age : 37
Location : Northampton
Re: Fluval Edge Fluorescent Lighting
![]() MrGator Mon Jul 19, 2010 2:34 pm
MrGator Mon Jul 19, 2010 2:34 pm
I've had guppies and bettas together in a number of tanks and have never had any problems with the bettas killing the guppies so I wouldn't worry too much.
I've emailed my lovely sketched guide and i'm going to post on here too - the CFL mod is fantastic - i'm also considering ordering some Coralife bulbs from ebay - they're about £11 each inc PP from America...
If you have any problems, tomorrow, drop me a text or email as i've got a pretty easy day after 10....
MrGator- Angelfish
- Posts : 71
Join date : 2010-06-30
Age : 41
Location : London, UK -
Guide to compact fluorescen
![]() MrGator Mon Jul 19, 2010 2:37 pm
MrGator Mon Jul 19, 2010 2:37 pm
My attempt at a sketched walkthrough!
Also just found out that if you save the images, they're full, not cut off as shown in the forum!!


Also just found out that if you save the images, they're full, not cut off as shown in the forum!!
MrGator- Angelfish
- Posts : 71
Join date : 2010-06-30
Age : 41
Location : London, UK -
Re: Fluval Edge Fluorescent Lighting
![]() MrGator Sat Jul 24, 2010 10:51 am
MrGator Sat Jul 24, 2010 10:51 am
Had a bit of a problem with the CFL on Tuesday - I came home from work and popped the lighting on but only one bulb came on.
I took the hood off to have a look and there was a lot of condensation on the bulbs and on the sockets which got me a bit worried. I dried it off with a hair dryer and switched it back on - we had smoke, horrible noises and a bang! The bulb had got wet in the starter and died.
So, what to do?!? I decided to make a splash screen. First I was going to make a cover for the light unit itself and so ordered two pieces of cur to size perspex from The Plastic People. It's free postage at the moment and they got it out to me next day. The sizes were 125mm x 197mm and 197mm x 83mm.
When it came to fixing the cover, i forgot about the neck on the edge which left the hood 2" higher than it should have been.
I then decided to make a cover for the maintenance hole instead, making a hinge using aquarium silicone. I had to place the larger piece over the hole and mark the lines of the neck. This was cut using a hacksaw and the edges and corners sanded with some aluminium oxide paper.
It works great - no condensation on the bulbs, no splashes from the filter and there's still access for feeding and maintenance!
Here's what we now have:

Splash cover down

Splash cover open!
I've also ordered some coralife tropical bulbs from the US to try as they bring out the reds and blues!
I took the hood off to have a look and there was a lot of condensation on the bulbs and on the sockets which got me a bit worried. I dried it off with a hair dryer and switched it back on - we had smoke, horrible noises and a bang! The bulb had got wet in the starter and died.
So, what to do?!? I decided to make a splash screen. First I was going to make a cover for the light unit itself and so ordered two pieces of cur to size perspex from The Plastic People. It's free postage at the moment and they got it out to me next day. The sizes were 125mm x 197mm and 197mm x 83mm.
When it came to fixing the cover, i forgot about the neck on the edge which left the hood 2" higher than it should have been.
I then decided to make a cover for the maintenance hole instead, making a hinge using aquarium silicone. I had to place the larger piece over the hole and mark the lines of the neck. This was cut using a hacksaw and the edges and corners sanded with some aluminium oxide paper.
It works great - no condensation on the bulbs, no splashes from the filter and there's still access for feeding and maintenance!
Here's what we now have:
Splash cover down
Splash cover open!
I've also ordered some coralife tropical bulbs from the US to try as they bring out the reds and blues!
MrGator- Angelfish
- Posts : 71
Join date : 2010-06-30
Age : 41
Location : London, UK -
Re: Fluval Edge Fluorescent Lighting
![]() Anna Tue Aug 03, 2010 2:58 am
Anna Tue Aug 03, 2010 2:58 am
I have just one question...Why is your water level so low? I mean...the plastic cover is genius, but it wouldn't be necessary if the water level was higher. My lights are just above the water, and I get no splashing because it isn't dropping water from such a high level.
Anna- Pygmy Cory
- Posts : 12
Join date : 2010-07-08
Re: Fluval Edge Fluorescent Lighting
![]() MrGator Tue Aug 03, 2010 3:08 am
MrGator Tue Aug 03, 2010 3:08 am
hey Anna,
the water level was low because I had a Betta. It's now been taken back to the pet shop and my water level is filled half way to the neck. The main problem was condensation though. It's been quite hot recently, even without the heater on and when the lights were off there was a lot of evaporation which condensed on the bulbs. There are small holes on the bulb starter where this water was getting in. When I shook one of the bulbs a flood came out! The splash cover/condensation tray stops this as all of the evaporated water condenses on it.
the water level was low because I had a Betta. It's now been taken back to the pet shop and my water level is filled half way to the neck. The main problem was condensation though. It's been quite hot recently, even without the heater on and when the lights were off there was a lot of evaporation which condensed on the bulbs. There are small holes on the bulb starter where this water was getting in. When I shook one of the bulbs a flood came out! The splash cover/condensation tray stops this as all of the evaporated water condenses on it.
MrGator- Angelfish
- Posts : 71
Join date : 2010-06-30
Age : 41
Location : London, UK -
Re: Fluval Edge Fluorescent Lighting
![]() Anna Fri Aug 06, 2010 3:05 am
Anna Fri Aug 06, 2010 3:05 am
Ahhh, okay. I've never had a beta, so I don't know what special requirements they have. Awesome idea though to keep the lights safe.
Anna- Pygmy Cory
- Posts : 12
Join date : 2010-07-08
Re: Fluval Edge Fluorescent Lighting
![]() *joanne* Wed Oct 27, 2010 12:23 pm
*joanne* Wed Oct 27, 2010 12:23 pm
Thanks for putting this up my light unit has broke so this looks like a great way to get better light.
Can I just ask what type of wire did you use and the lenght that is needed
Can I just ask what type of wire did you use and the lenght that is needed
*joanne*- Neon Tetra
- Posts : 3
Join date : 2010-10-27
Re: Fluval Edge Fluorescent Lighting
![]() MrGator Fri Oct 29, 2010 12:30 pm
MrGator Fri Oct 29, 2010 12:30 pm
Hey,
I just got standard dual core wire (5m) from Wilkinsons. It was about £3. The length is up to you - how long do you want the cable to be?!?
Magister
I just got standard dual core wire (5m) from Wilkinsons. It was about £3. The length is up to you - how long do you want the cable to be?!?
Magister
Last edited by MagisterArtium on Fri Dec 30, 2011 4:06 am; edited 1 time in total
MrGator- Angelfish
- Posts : 71
Join date : 2010-06-30
Age : 41
Location : London, UK -
Re: Fluval Edge Fluorescent Lighting
![]() *joanne* Mon Nov 08, 2010 11:38 am
*joanne* Mon Nov 08, 2010 11:38 am
Thanks got my wire from Wilkinsons in the end have most things now but got to wait 2 weeks for my bulbs as they are out of stock.
*joanne*- Neon Tetra
- Posts : 3
Join date : 2010-10-27
lighting
![]() Revsy Wed Jul 06, 2011 11:54 am
Revsy Wed Jul 06, 2011 11:54 am
Hello there!!
This is my first post/reply
I want to upgrade my lighting in my edge tank, but wasnt sure how to go about it until i read your post, great work there mate i like it, just one question if u dont mind but did you get all the stuff from wilkinsons? and what are the exact spec on the bulbs i.e size,wattage
Cheers Revsy
Revsy- Posts : 1
Join date : 2011-07-06
*joanne*- Neon Tetra
- Posts : 3
Join date : 2010-10-27
» THE BEST LED UPGRADES FOR THE FLUVAL EDGE
» Fluval Edge 2 46L
» The new Fluval Edge range
» Planted 46l with CO2
» New Fluval edge setup
» Fluval Edge 2 46L
» The new Fluval Edge range
» Planted 46l with CO2
» New Fluval edge setup
Page 1 of 1
Permissions in this forum:
You cannot reply to topics in this forum|
|
|